
If you're a fan of the beloved Winnie the Pooh stories and want to bring a touch of nostalgia into your home, why not try crocheting a classic Pooh rug? This delightful project is sure to bring a smile to your face every time you step foot on it, with its charming design featuring Pooh Bear and his friends from the Hundred Acre Wood. Whether you're an experienced crocheter or just starting out, this pattern is a great way to showcase your love for all things Pooh and create a cozy addition to any room. So gather your yarn and crochet hook, and let's embark on a crochet adventure with this classic Pooh rug pattern!
| Characteristics | Values |
|---|---|
| Pattern type | Rug crochet |
| Design | Classic pooh |
| Skill level | Intermediate |
| Yarn weight | Worsted |
| Hook size | 5mm |
| Finished size | 36 inches x 36 inches |
| Color options | Multiple |
| Gauge | Not specified |
| Additional materials | Rug pad, yarn needle |
| Abbreviations used | SC (single crochet), HDC (half double crochet), DC (double crochet), FO (fasten off), CH (chain) |
What You'll Learn
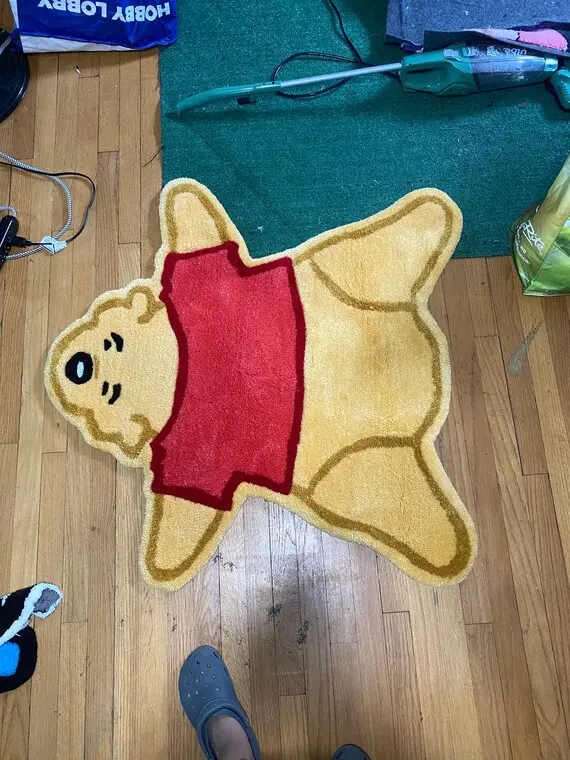
![]()
Introduction to the classic Pooh rug crochet pattern

Welcome to our blog post on the classic Pooh rug crochet pattern! In this post, we will provide you with an introduction to this delightful crochet pattern, including all the details you need to get started on your very own classic Pooh rug project.
The classic Pooh rug crochet pattern is perfect for those who are fans of the beloved Winnie the Pooh and his friends. Whether you're looking to make a special gift for a loved one or add a touch of whimsy to your home decor, this crochet pattern is sure to bring joy and nostalgia.
To begin your classic Pooh rug crochet project, you will need a few essential supplies. These include yarn in various colors, a crochet hook, and a tapestry needle. You can choose yarn colors that closely resemble the colors of the original characters or get creative and make your own unique color choices.
Once you have your supplies ready, it's time to start crocheting! The classic Pooh rug pattern typically involves creating individual squares or motifs that are later joined together to form the final rug. You will need to follow a chart or written instructions for each square or motif, which will specify the stitches, colors, and placement.
As you work on each square or motif, pay close attention to the tension of your stitches to ensure that they are even and consistent. This will help maintain a neat and polished appearance in your finished rug. Don't be afraid to take your time and experiment with different techniques to achieve the desired look.
Once you have completed all the squares or motifs, it's time to join them together using a whip stitch or a slip stitch method. This step requires precision and attention to detail to ensure that the rug sits flat and the seams are invisible. Take your time and use a tapestry needle to weave in any loose ends for a clean finish.
After joining all the squares or motifs, you may choose to add a border to your classic Pooh rug. This can be a simple single crochet border or a more intricate design, depending on your personal preferences. The border not only adds a decorative touch but also helps to stabilize the rug and prevent it from stretching or warping over time.
Finally, give your classic Pooh rug a good blocking to even out the stitches and allow it to lay flat. Blocking involves wetting the rug, gently stretching it into shape, and allowing it to dry completely before using or displaying. This step is especially important if your rug is made from natural fibers that tend to relax and loosen with use.
So there you have it - a brief introduction to the classic Pooh rug crochet pattern. With some time, patience, and creativity, you can create a beautiful and nostalgic rug that will bring joy and warmth to any space. Happy crocheting!
Creating a Beautiful Circular Crochet Rag Rug: Step-by-Step Instructions
You may want to see also
![]()
Materials needed for creating a classic Pooh rug

Creating a classic Pooh rug can be a fun and rewarding project for any crochet enthusiast. Before you begin, it's important to gather all the necessary materials to ensure a successful outcome. Here is a detailed list of what you will need:
- Yarn: Choose high-quality, durable yarn in the colors you need for your Classic Pooh rug. You will need yarn in various shades of brown for Pooh's body, yellow for his shirt, red for his shirt's collar, and white for his eyes and mouth. Additionally, you will need black yarn for Pooh's eyebrows, nose, and other details. Opt for acrylic or cotton yarns for easy maintenance and long-lasting results.
- Crochet Hooks: Select crochet hooks in different sizes, depending on your yarn's thickness and desired tension. A size G or H hook is usually ideal for worsted weight yarn, but adjust accordingly if using a different weight.
- Yarn Needle: A yarn needle is essential for weaving in loose ends, sewing pieces together, and adding finishing touches to your rug. Look for a needle with a large eye for easy threading.
- Scissors: A good pair of sharp scissors is necessary for cutting yarn and trimming any excess ends.
- Stitch Markers: Stitch markers can be helpful for keeping track of your stitches, especially when working on complex patterns or shaping. They can be as simple as safety pins or specialized markers designed for crochet.
- Stuffing: If you plan to make your rug three-dimensional, you'll need polyester fiberfill or another type of stuffing to fill Pooh's body and other parts.
- Safety Eyes or Buttons (Optional): For a more realistic touch, you can use safety eyes or buttons for Pooh's eyes instead of crocheting them. These can be found at craft stores and come in different sizes.
- Pattern and Graph: Find a classic Pooh rug crochet pattern and graph that provides a visual representation of the design. This will guide you in creating accurate shapes and details.
- Padding or Rug Base: To give your rug stability and a cushiony feel, you will need a suitable base or padding. This can be a rug pad or foam padding, cut to your desired size and shape.
- Non-Slip Fabric or Rug Gripper (Optional): If your rug will be placed on a smooth surface, adding a non-slip fabric or rug gripper to the bottom will ensure it stays in place.
Once you have gathered all these materials, you'll be well-prepared to embark on your classic Pooh rug crochet project. Remember to take your time, follow the pattern instructions carefully, and enjoy the process of bringing this beloved character to life in crochet form. Happy crocheting!
Creating a Cozy and Adorable Crochet Elephant Rug for Your Home
You may want to see also
![]()
Step-by-step instructions on how to crochet a classic Pooh rug

Do you have a soft spot for Winnie the Pooh and love crocheting? Why not combine your passions and create a classic Pooh rug? Crocheted rugs are not only charming and cozy, but they also add a touch of nostalgia to any room. In this blog post, we will provide you with step-by-step instructions on how to crochet your very own classic Pooh rug.
Materials you will need:
- Worsted weight yarn in various colors (red, yellow, blue, white, brown, and black)
- Crochet hook size H/5mm
- Scissors
- Tapestry needle
- Non-slip rug pad (optional)
Step 1: Starting with Pooh's Face
To begin, we will create the center of the rug, which features Pooh's face. Start by making a magic ring and crochet 6 single crochet stitches (sc) into the ring. Pull the ring tight, and join with a slip stitch (sl st) to the first sc. This forms your starting circle.
Step 2: Increasing the Circle
Round 1: Chain 1, then work 2 sc into each stitch around. Join with a sl st to the first sc. (12 stitches)
Round 2: Chain 1, *1 sc in the next stitch, 2 sc in the following stitch* Repeat from * to * around. Join with a sl st to the first sc. (18 stitches)
Step 3: Crocheting Pooh's Face
Round 3: Chain 1, *1 sc in the next 2 stitches, 2 sc in the following stitch* Repeat from * to * around. Join with a sl st to the first sc. (24 stitches)
Round 4-8: Chain 1, work 1 sc in each stitch around. Join with a sl st to the first sc. (24 stitches)
Step 4: Adding Pooh's Features
For Pooh's eyes, nose, and mouth, you will switch to different colors of yarn. If you're using black yarn for these features, you can embroider them onto the face using a tapestry needle. Alternatively, you can crochet small circles for the eyes and nose, and use black yarn for the mouth.
Step 5: Crocheting Pooh's Body
For the body of the rug, we will create concentric circles around Pooh's face. To start, chain 2 and crochet 8 single crochet stitches into the second chain from the hook. Join with a slip stitch to the first single crochet.
Round 1: Chain 1, work 2 single crochet stitches into each stitch around. Join with a slip stitch to the first single crochet. (16 stitches)
Round 2: Chain 1, *1 single crochet in the next stitch, 2 single crochet in the following stitch* Repeat from * to * around. Join with a slip stitch to the first single crochet. (24 stitches)
Continue increasing the number of stitches in each round by adding 8 stitches evenly spaced until you reach your desired rug size. You can also add additional rounds without increasing if you want a larger rug.
Step 6: Finishing touches
To finish your classic Pooh rug, weave in any loose ends and trim them. If desired, you can attach a non-slip rug pad to the back of your rug to prevent it from sliding on smooth floors.
And there you have it! By following these step-by-step instructions, you can create a beautiful and charming classic Pooh rug. Display it proudly in your home or gift it to a fellow Pooh enthusiast. Happy crocheting!
Crocheting the Perfect Mug Rug: Cozy and Stylish Designs for Your Coffee Break
You may want to see also
![]()
Tips and tricks for customizing your classic Pooh rug design
Designing and creating a classic Pooh rug is a fun and creative way to add a touch of nostalgia to your home. But why settle for a generic design when you can customize the rug to make it truly unique? Here are some tips and tricks for customizing your classic Pooh rug design.
- Choose the right yarn and colors: When customizing your classic Pooh rug, it's important to choose the right yarn and colors. Opt for a soft and durable yarn that is suitable for rug making. Consider using different shades of brown and yellow for Winnie the Pooh, and other vibrant colors for the supporting characters like Tigger, Piglet, and Eeyore. Experiment with different combinations to find the perfect color palette for your rug.
- Add personal touches: To make your classic Pooh rug truly one-of-a-kind, consider adding personal touches to the design. Incorporate your favorite Winnie the Pooh quotes or your family's names into the rug. You can either crochet the letters directly onto the rug or use embroidery to add them later.
- Experiment with different stitches: Instead of sticking to the basic crochet stitches, try out different textured stitches to add depth and interest to your classic Pooh rug. For example, you can use popcorn stitches for Pooh's honey pot or bobble stitches for Tigger's stripes. By incorporating different stitches into your design, you can make the rug visually appealing and unique.
- Use different rug sizes: Classic Pooh rugs come in various sizes, so you have the freedom to choose the size that best suits your space. Consider the dimensions of your room or the area where you plan to place the rug, and select the appropriate size accordingly. You can also experiment with different shapes such as oval or rectangular rugs to add more visual interest.
- Combine crochet with other techniques: Don't limit yourself to just crochet when customizing your classic Pooh rug. Consider combining crochet with other techniques like latch hooking or rug tufting to add texture and dimension to your design. By incorporating different techniques, you can achieve a more multidimensional and visually appealing rug.
- Add embellishments: To make your classic Pooh rug even more special, consider adding embellishments like buttons, ribbons, or beads. You can use buttons for Pooh's eyes or a decorative ribbon as a border for the rug. Beads can be added as accents to the characters or as a way to create texture and depth. These small details can make a big difference in the overall look of your rug.
Remember, the key to customizing your classic Pooh rug is to let your creativity shine. Experiment with different techniques, colors, and personal touches to create a rug that is truly unique to you. With these tips and tricks, you'll be able to design a classic Pooh rug that will bring joy and nostalgia to any room in your home.
The Timeless Craft: Amish Rag Rugs and the Art of Crochet
You may want to see also
Frequently asked questions
You can find the classic Pooh rug crochet pattern on various online platforms and websites that specialize in crochet patterns. Some popular sites include Ravelry, Etsy, and Craftsy.
The difficulty level of the classic Pooh rug crochet pattern can vary depending on the specific design and techniques used. However, many patterns are designed with clear instructions and step-by-step guidance, making them accessible to beginners with some basic crochet knowledge.
The materials needed for the classic Pooh rug crochet pattern typically include a crochet hook, yarn in various colors, scissors, and a tapestry needle. The specific yarn and hook size may vary depending on the pattern, so it's important to check the materials list provided with the pattern.
The time it takes to crochet the classic Pooh rug can vary depending on the size of the rug, the complexity of the pattern, and the individual's crochet skill level. Some patterns may take a few hours or a couple of days to complete, while larger or more intricate designs may require several weeks or even months of work.


